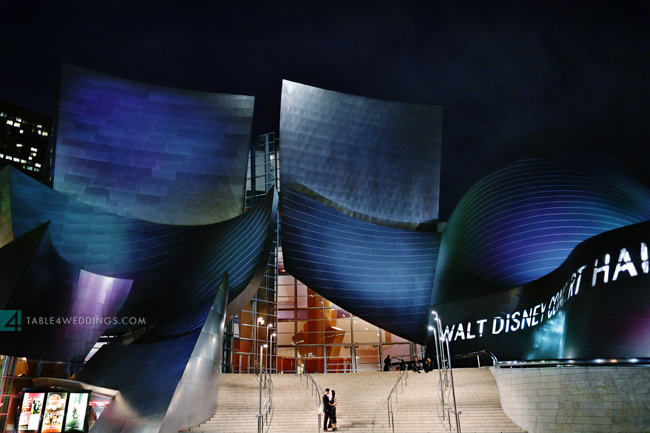
The Disney Concert Hall in Downtown LA is a beautiful architectural wonder. It’s a naturally amazing structure and a popular spot for Southern California photographers and tourists alike. As soon as I saw it, I knew I wanted to photograph it, but with a little twist. I’m a flash junkie, so I knew I wanted to find a way to photograph the building at night and make it a little different than what people see with the naked eye. Working with flash is always a little bit risky, but fortunately, I have clients that love taking risks with me!
GEAR:
Canon 5D Mark III
Canon 24mm f/1.4
Canon 580 EXII Flash
Flash triggers (I used the Phottix Strato II’s)
One colored gel (I used a CTB blue one)
Tripod
A wife (or assistant)
TECHNIQUE:
First, you need to know this is a composite. I used one flash and composited 16 photos together. This is an easy way to light a scene without owning and setting up 8 billion flashes to go off for one picture. Because it’s a composite, it’s also very important that your camera takes the photo from the same spot each time, so for that, I used a tripod and my wife.
First Shot – The Couple
The first shot I took was a shot of the couple, engaged in each other, with a little bit of a flash to bring them out of the background. The flash had no gel on it.
 24mm, 1/60, f/2.0, ISO3200, Auto WB, shot in RAW
2nd-14th Shot – The Concert Hall
Now that I had my shot of the couple, I needed to light up the Concert Hall with a blue gelled flash. The reason I chose a blue gel is so I could make everything that light touches blue just by changing the white balance in Lightroom. Below, you can see all the different parts of the hall that I flashed, using just one flash and a monopod. Since I was shooting in RAW, I left the in camera white balance to Auto.

This is where my wife played a huge role. While I ran around pointing the flash, I would hold up my hand whenever I wanted her to press the shutter. You’ll notice that there were some spots that I flashed several times, just to make sure I got it. I also told the couple that they didn’t have to hold the pose anymore, so you can see them patiently standing around waiting for me to finish running in circles.
15th Shot – Happy Accident
The 15th shot (last one, bottom right corner) was actually the 2nd shot I took. I dropped the aperture down to f/4.0 and had my wife come around to the front of the couple to light them, as a backup shot in case #1 didn’t work out. Turns out, the exposure was perfect for the movie posters.
PROCESSING:
Now that I had all my photos, I took them into Lightroom, set the white balance to tungsten, adjusted the exposures/contrast slightly, and exported all the photos to Photoshop. Setting a custom white balance really helps to pop out the blue gelled flashes!
[REWIND: How to Create a Sequence Composite in Photoshop and Lightroom]

In Photoshop, the only thing left to do is line up each layer on top of the first shot and mask in the parts I want to be revealed. There’s a neat function in Adobe Photoshop under the Edit menu that Auto-Aligns the layers for you (but this was a lot easier since I was shooting with a tripod).
After masking in/out all the parts that were lit by the flash, it was just a matter of adding some more contrast, dodging/burning, toning some of the blues, and removing some unwanted guests.
TIPS:
- Use a tripod!
- Bring an assistant.
- Use those gels and white balances.
- In Photoshop, layer on and mask only one image at a time.
- When doing this, I guessed and manually set the flash power to 1/8th. It worked out perfectly!
- Most importantly, go out, take some risks, and have fun!

Get Connected!