Adobe Lightroom is a great RAW editing program that enables photographers to edit and export images that are ready for high quality printing. With the right export settings, you should be able to export your raw images out of Lightroom directly to a JPG or TIF file, one that you can send directly to a print lab! In this article, we’ll show you the best export settings for print and even show you how to create your own export preset. Note: If you’re looking for guidance on the best export settings for other types of uses, such as Instagram, Facebook, and Blogging, see our complete article on the Best Lightroom Export Settings. In this article, we’ll focus exclusively on exporting for print.
The Best Lightroom Export Settings For Print

The following export settings are ideal for print:
File Settings
- Image Format: JPEG
- Color Space: sRGB
- Quality: 100
- Limit File Size To: (unchecked)
Image Sizing
- Resize to Fit: Unchecked
- Resolution: 300
Output Sharpening
- Sharpen For: Glossy Paper
- Amount: Standard
Download & Install Our Export Presets
 For your convenience, we created a set of Free Lightroom Export Presets that include export presets for the following: 1) Print (Full Resolution), 2) Facebook, 3) Instagram, 4) Web (Blogging and Email), 5) Display – 4K You can download them for free here.
Steps for Dialing in Lightroom Export Settings For Print
After you’ve fully edited your raw images in Lightroom, (and have decided that they don’t require any additional editing or scaling in Photoshop) you can jump into the export settings dialog…
Step 1 – Open the Lightroom Export Dialog
On a Mac, hit “CMD+Shift+E” On a PC, hit “CTRL+Shift+E” These are the hotkeys to open the export dialog. You’ll have main option tabs for the following:
- Export Location
- File Naming
- Video
- File Settings
- Image Sizing
- Output Sharpening
- Metadata
- Watermarking
- Post-Processing
Step 2 – Select The Export Location
The first export option is important, of course, because it controls where your actual files will be exported to.
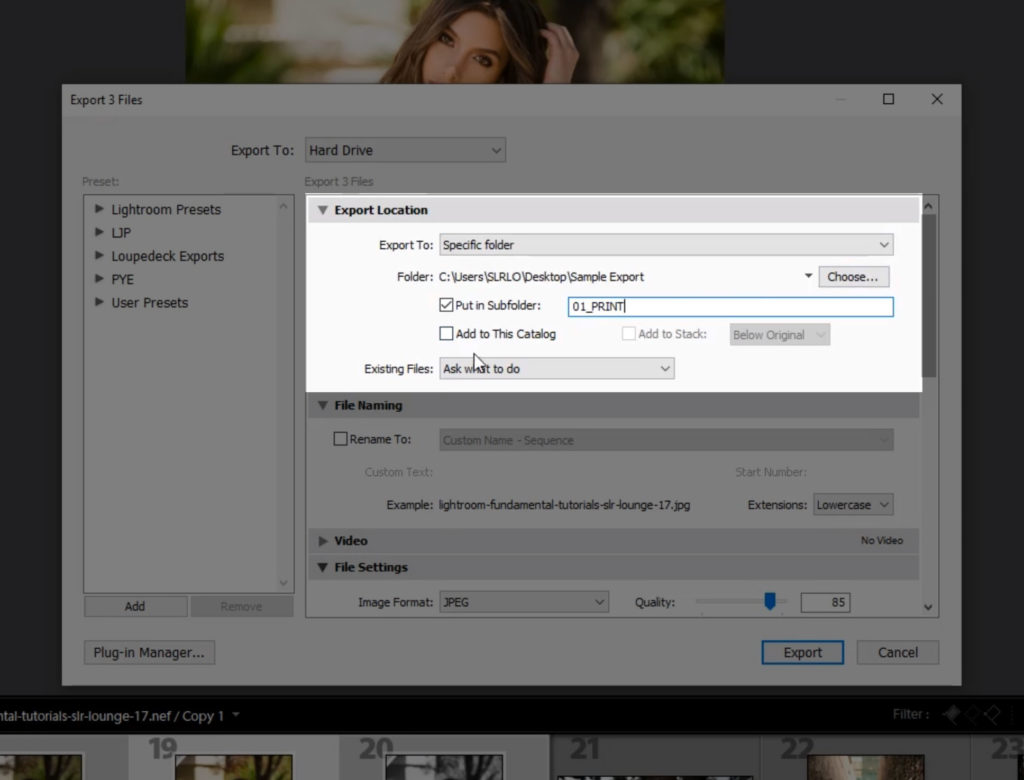
Usually, instead of creating your print-read JPG or TIF file in the same folder as the dozens or hundreds of original raw files, you’ll want to create a new folder for “PRINT” somewhere on your computer, either in a central location for all your print files, or within the same parent folder as your original files for that particular day or job.
2b. Specific Folder & Subfolder Settings
Usually, you want to choose the Export Location option for “Specific Folder”. Then, locate either your central “PRINT” folder, or whichever similar print folder you’ve created for this particular photo shoot. Alternately, you can simply select a main folder, and then use the “Put in Subfolder” option to create a “PRINT” folder. This option is particularly useful if you would like to create multipe export folders within the same parent folder, such as one for print-ready JPG/TIF files, and another for Facebook/Instagram and other mobile device, or screen/slideshow files, etc. [Related Article: Lightroom Export Settings for Instagram & Facebook]
Step 3 – Rename The Exported Photos (File Naming)
If you would like to create a new name for your print-ready image files, the next main export tab is where you’ll do that. For example, you could simply rename your image from “IMG_4658.ARW”…to… “IMG_4658–PRINT-16×20.JPG” (Don’t worry, we’ll get to the actual resizing and file type settings next! This is just a file name for your own clarity.)
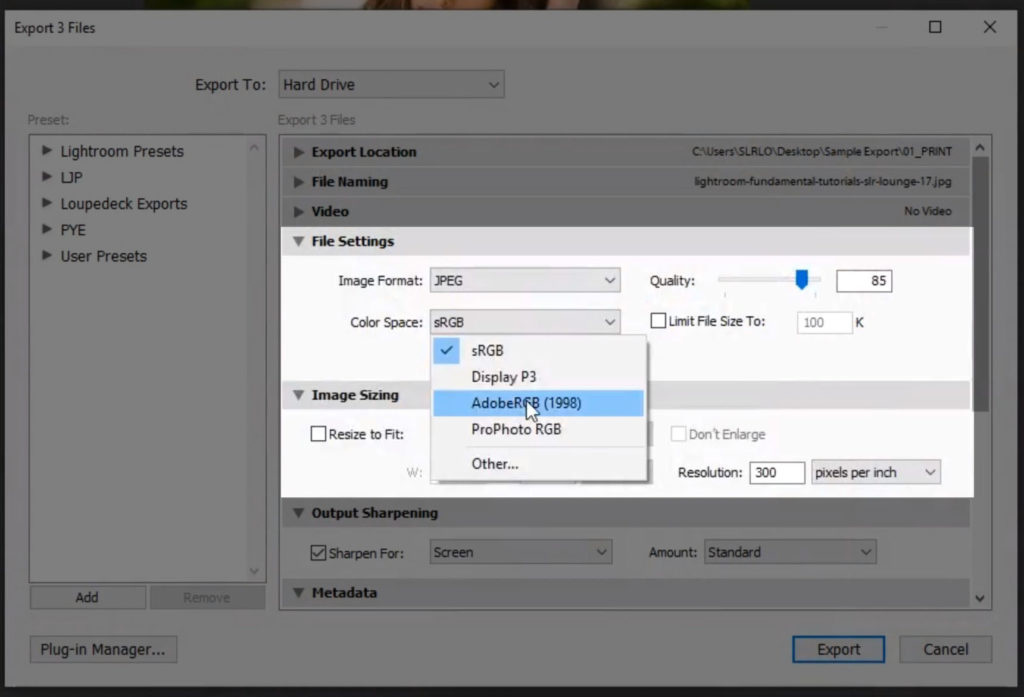
Step 4 – Choose Your File Settings
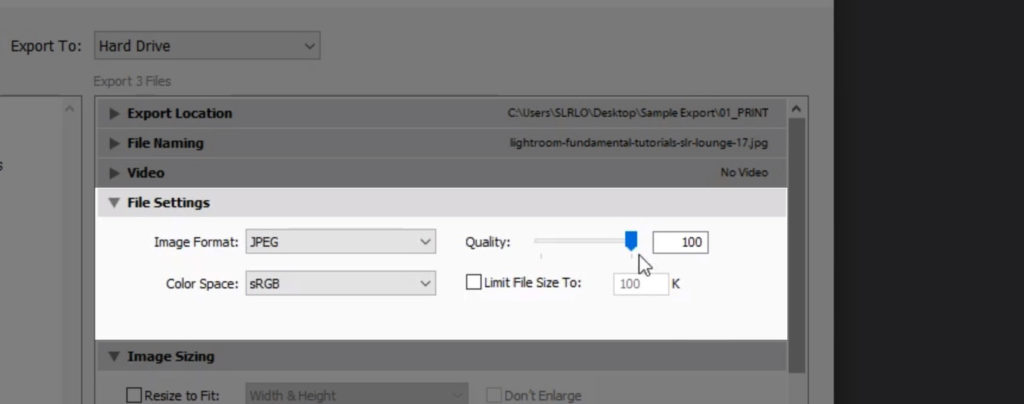
This is where you’ll designate the actual type of file that you export. As a general rule, most printers and print labs will prefer the format of JPG files, in the color space of sRGB. However, some specialty labs may ask for TIF files and/or Adobe RGB color space for maximum print quality. The important thing here is to know what your printer/lab prefers! If you’re printing from home then follow the best practices recommendations that came with your printer, or if you’re using an online or local professional print lab, reach out to them and ask!
If you are exporting JPG files for print, you usually will want to set the “Quality” slider to its highest setting, 100, however if you are delivering an extremely large file or numerous files to a client or print lab, it is unlikely that they will see any difference if you reduce the JPG Quality to 85-90.
Step 5 – Image Sizing Lightroom Export Settings
As with your File Settings options, your Image Sizing settings will depend on what printer/lab you are using. Usually, you will want to leave these settings alone, (un-check the “Resize to Fit” box) however, if you are making a very small print such as a 4×6 then you might change the settings to be “Long Edge”, “6 inches”, and “Resolution: 300 pixels per inch” …just to save a bit of time if you’re uploading dozens of images to an online print lab, and they will never be printed larger later. In most cases, again, just leave Image Sizing alone. (If you are making a very large print, then the lab can probably do a better job of “upscaling” your image for you!) NOTE: PPI? DPI? Does It Even Matter? Before we move on, let’s clear up one thing- PPI stands for pixels per inch, and it refers to a relatively arbitrary setting that isn’t directly tied to the actual image size, aka the megapixels. PPI is a number that corresponds to the inch dimension, and is only relevant to printing if the printer or lab requires it to be intentionally set. In other words, this might be very important if you’re printing at home, however, most online labs will be happy to adjust the PPI and inch dimensions for you; just be sure to send them the full-resolution (megapixels) file! Lastly, DPI refers to dots per inch, and is unrelated to PPI. DPI is the number of actual ink dots that a printer can resolve, which is usually much higher than the actual pixels in the image.
Step 6 – Output Sharpening Export Settings

This is another setting that you will likely want to disable, and mange in the Lightroom Develop Module “Details” panel. However, if you do choose to use any Output sharpening, select “Matte” or “Glossy, and then either “Low” or “Standard” for the amount.
Step 7 – Choose Metadata Export Settings
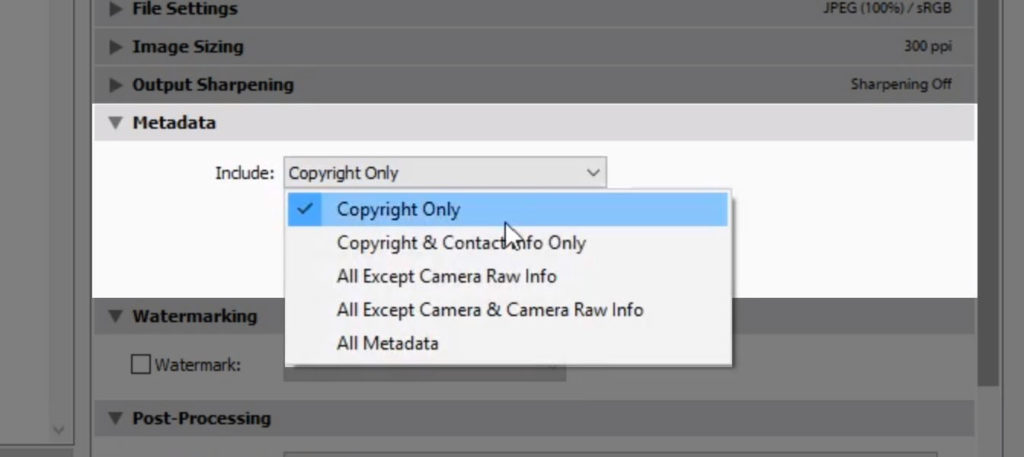
Usually when creating a print, including the camera’s exposure information is not necessary, of course, so you can select “Copyright & Contact Info Only”. This will allow a print lab to see your own copyright metadata, but nothing else. [Related Reading: How To Create An Import / Metadata Preset in Lightroom]
Step 8 – Lightroom Watermark Settings
Most printed images should not have a watermark on them, of course, however, if for any reason you are creating a print with your own personal watermark on it, you can do that here, without having to go into Photoshop and spend extra time on layers and opacity, etc.
Step 9 – Post-Processing Settings In Lightroom Export Dialog
If you would like your computer to show you the folder where your print-ready image was exported as soon as it is done exporting, then you can select the option “Show in Finder/Explorer”. Otherwise, select the option, “Do Nothing”.
Step 10 – Save Your Settings as an Export Preset
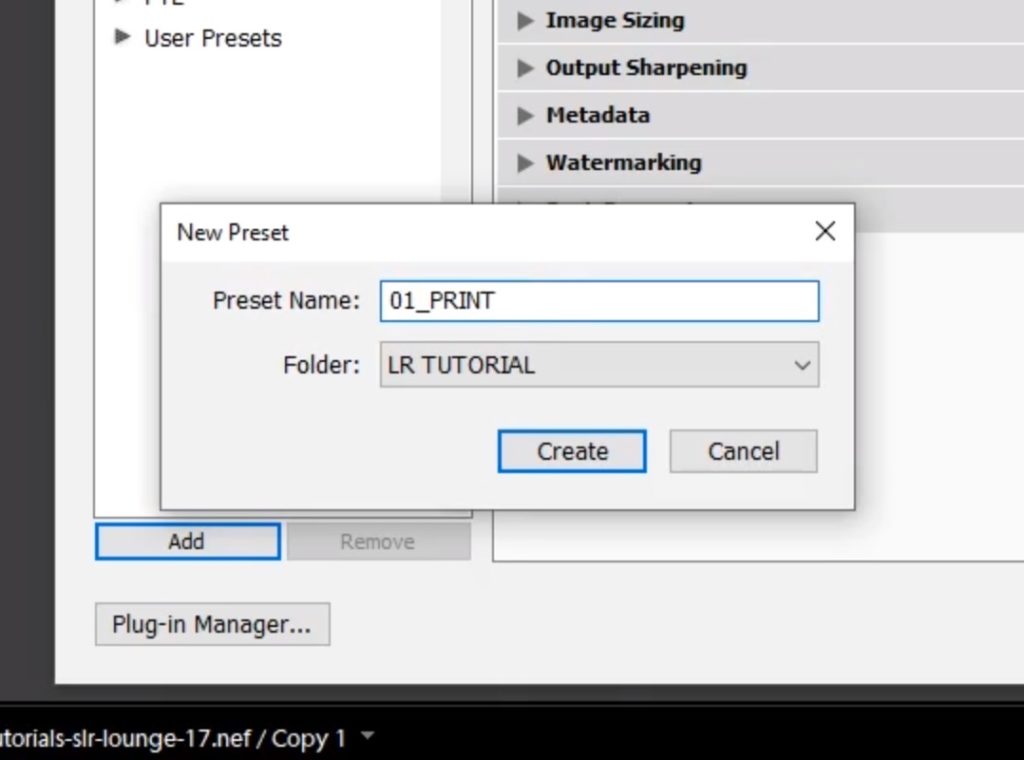
If you plan to export other images for similar printing needs, then you should probably create a preset for these export settings! Of course, if you want these export settings to simply be a default or a starting point. you can always re-open the export dialog, select this export preset, and then fine-tune things like file size or folder location, too.
Step 11 – Hit Export, Send to the Lab!
Last but not least, of course, export your print file, and send it off to your lab! Of course, do yourself a huge favor and double-check your export settings one more time before hitting “Export”. Also, double-check what your printer or lab requires! Make sure that if it’s an online print lab that prefers sRGB JPG files, you aren’t trying to send them a TIF file with ProPhoto RGB. (Or, of course, vice-versa!)
More Adobe Lightroom Tutorials and Workshops
You’ll find our complete workshop on Mastering Lightroom here.

Get Connected!