We’ve teamed up with Adorama to bring you a series of photography tutorials called “Master Your Craft” to be featured on their Youtube Channel. Subscribe to see more of our videos on their channel that covers all things photography-related from lighting and posing to editing to help you hone your skills and master your craft and don’t forget to check out our playlist to watch the entire series! In this video, I’ll be sharing with you my dynamic posing guide for men to capture natural and confident images of your clients.
Video: Dynamic Posing Guide for Groomsmen in 10 Minutes
If you’re a wedding and portrait photographer, you’ve likely had clients who don’t know how to pose in photos. What you end up are often stiff, awkward, and plain images that don’t stand out. Luckily, posing for men can be quite simple with just a few pointers and tips. This dynamic posing guide is easy enough for anybody to follow. Starting from the feet, I’ll work my way up posing each part of the body. We developed a system called “Foundation Posing.” The result will be a natural look that can transform your image.
Before we begin, be sure to follow my friend Derek, who I’ll be photographing for this tutorial. Let’s jump in.
Related Reading: Foundation Posing Framework
The Worst Case Scenario

First, I’ll show you the worst case scenario. This is if the client has no idea how to pose. The ending result will be an image like the one above. As we fix the pose, the most important point to keep in mind is how body language communicates.
Tip #1: Toes Pointed Out
You may find some clients who point their toes slightly inward. This could convey a lack of confidence. Instead, pointing the toes out conveys a sense of strength and comfort.
Tip #2: Feet Shoulder Width Apart

Don’t go wide. However, don’t go too narrow either. The right amount would be about shoulder’s length. Here’s the before and after once we correct the feet. Now let’s move onto the hips.
Tip #3: Lean to One Side
While men can get away with standing straight, one tip is to put all the weight onto one leg. The official term for this is called “Contrapposto” from the Greeks.” This creates an asymmetry that looks natural and comfortable.
Tip #4: Give the Hands Purpose

Hands are tricky because we often don’t know what to do with them. Usually, we like to keep them occupied rather than just dangling on our sides. They’re always communicating something. The trick is to give them a purpose such as adjusting the lapel. However, just to start, I’ll have Derek put one hand in his pocket. This provides a great and natural base.
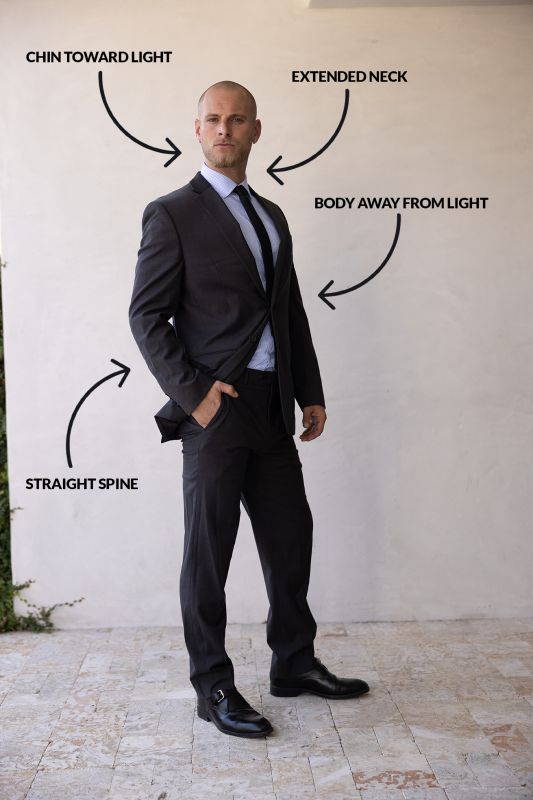
Tip #5: Straighten the Spine

‘Keeping a straight posture gives off a confident appearance. We want the spine to have a natural curve to it as I demonstrate above.
I instruct my clients to act as though a string is gently pulling up from their head. Be careful not to overdo it, however. Overdoing it can look just as unnatural.
Tip #6: Extend the Neck Forward
The neck and jawline are important for men. We want to define the jawline and have it stand out. Extending the head forward just a touch will accentuate the jawline.
Tip #7: Turn the Body Away From the Light
To help emphasize the jawline, first, turn the body away from the light. Then, move onto the next tip.
Tip #8: Turn the Chin Toward the Light

With the body turned away, turn the chin back toward the light. This creates great light on the face. The shadows create a dramatic affect. In addition, the shadows help lean out the subject.
Tip #9: Lower the Camera Angle

You’ll notice that a higher angle will shorten the appearance of the legs. The lower we place the camera, the longer the leg appears. Be sure to use a wider angle lens between a 24-50mm and keep the camera low.

The result will be your subject appearing taller and more prominent. Here is the before and after up to this point.
Tip #10: Capture Action and Detail Shots

To add interest to your images, you can do two things. First, have your subject do something. For example, you can have your subject adjust his tie. Another example would be to adjust the cuff link. Second, be sure to get a variety of depths. Getting closer shots as well as wide shots will create a unique story.
Bonus Tip: Cropping
Be careful not to crop at joints or where the body begins to widen out. I usually keep my images cropped at the thigh to show the gap between the legs. This helps with form. If not there, I’ll crop above the hips.
Final Images

Here is the final collage of the various images we captured. Adding movement as well as close up and medium shots gives a sense of story and detail.
Conclusion
I hope you enjoyed this tutorial/video. Next time you’re with a client, be sure to practice this dynamic posing guide. You’ll find that any client regardless of experience in front of the camera can look natural. For more tips on posing, check out our “Foundation Posing” workshop from our Premium Channel. In addition, be sure to check out Visual Flow for the presets we used to edit our images.
Don’t miss our next episode of Mastering Your Craft on Adorama’s YouTube channel next week! If you want to catch up on all the episodes, make sure you check out our playlist!


Get Connected!